How to Keep Subtitles and Audio Tracks When Removing iTunes DRM?
When you play iTunes purchased or rented movies, or iTunes TV shows and music videos, you may find that most of them are included subtitles and audio tracks depending on different lanuages. As we know, if you want to play your iTunes vidoes on multiple portable devices while keeping the iTunes subtitles and audio tracks at same time, you may need to strip DRM from iTunes at first and then keep all subtitles and audio tracks.
AVS4Mac iTunes DRM Converter would help you get rid of DRM restrictions from all iTunes videos, both Rentals and Purchases. After removing DRM, you can keep the subtitle and audio track in original video well and preserve the source quality 100%. In addition, after removing DRM, you can also share the iTunes videos with your family or friends and enjoy the unprotected videos on any device such as Samsung Galaxy Series, Amazon Kindle Fire, Nexus, Nook, HTC, etc. Now, follow the step-by-step tutorial about how to keep iTunes subtitles and audio tracks when removing DRM protection.
Key Features of AVS4Mac iTunes DRM Converter
* Keep subtitles and audio tracks when removing iTunes DRM
* Convert iTunes M4V videos to MP4, AVI, MOV, FLV, MPEG, etc
* Output files for Google Nexus, Samsung Galaxy Series, Surface RT/Pro, Nokia Lumia, Kindle Fire, etc
* Easy to use and complete removing DRM from M4V movies with simple clicks.
![]()
![]()
Guide: How to keep iTunes subtitles and audio tracks when removing DRM protection
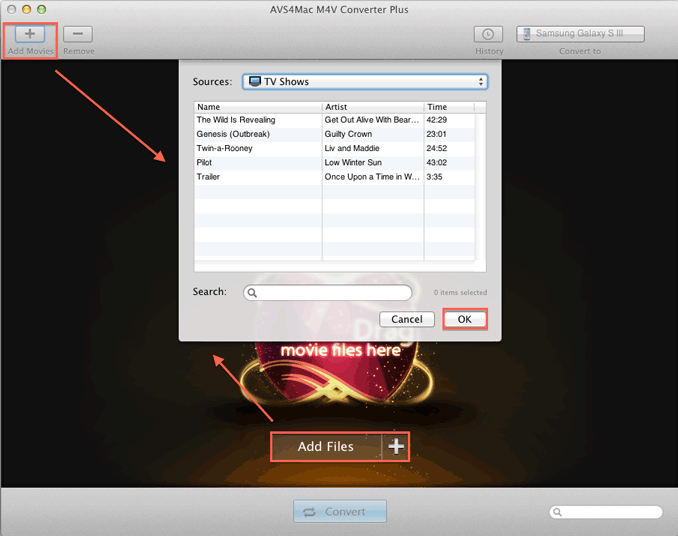
Step 1. Add iTunes M4V Media Files
Click the Add Movies or Add Files button, then software will open the iTunes movies library by default and all available videos such as movies, TV shows or music videos you purchased or rented from iTunes will be listed. Select the files and then click "OK".
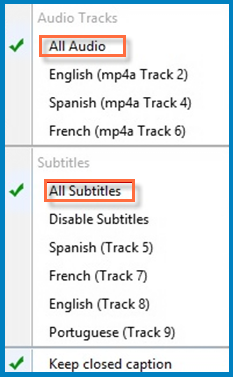
Step 2. Save Subtitles and Audio Tracks
Click "Profile" drop down list, you can create user-defined output profiles for iTunes DRM M4V videos. Then please click the Settings button on the right of the loaded video and choose to save All Audio and All Subtitles. You can also choose certain audio track or subtitle you want to keep in the drop-down list. Then the file will show up the audio tracks and subtitles information you selected.
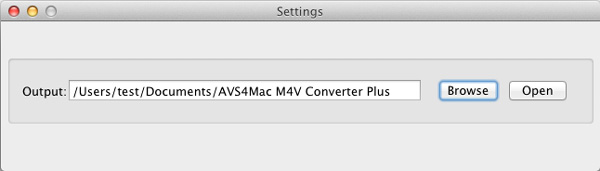
Step 3. Custom Output Path
Click menu bar "AVS4Mac M4V Convert Plus>Preferences", in the popup box, you can click "Browse" button to change the output path and "Open" button to open the output folder. If you don't custom output path, the output files will be saved in the default folder.
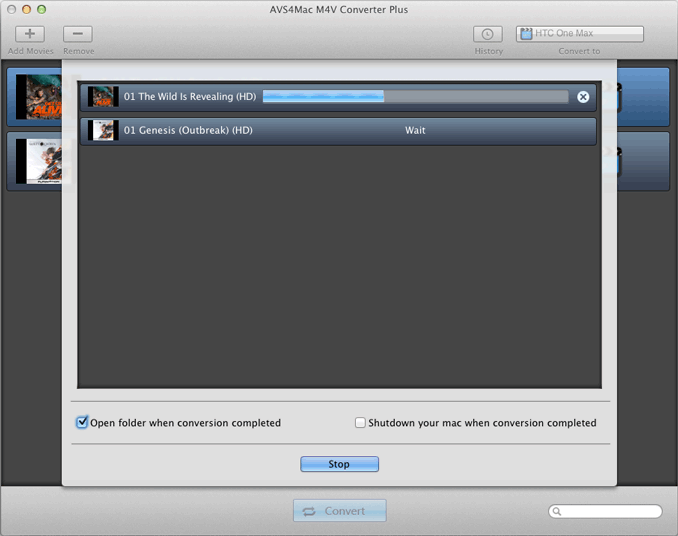
Step 4. Start Conversion
Click "Convert" button to remove the DRM protection while keeping the iTunes subtitles and audio tracks. AVS4Mac iTunes Converter supports batch M4V Conversion to save your time by creating a batch list of M4V videos. After the conversion, you can easily keep all the multilanguage subtitles and audio tracks after removing DRM from iTunes movies.